Powered by Blogger.

Butterick 4496

Butterick 4496

1980's Blouse

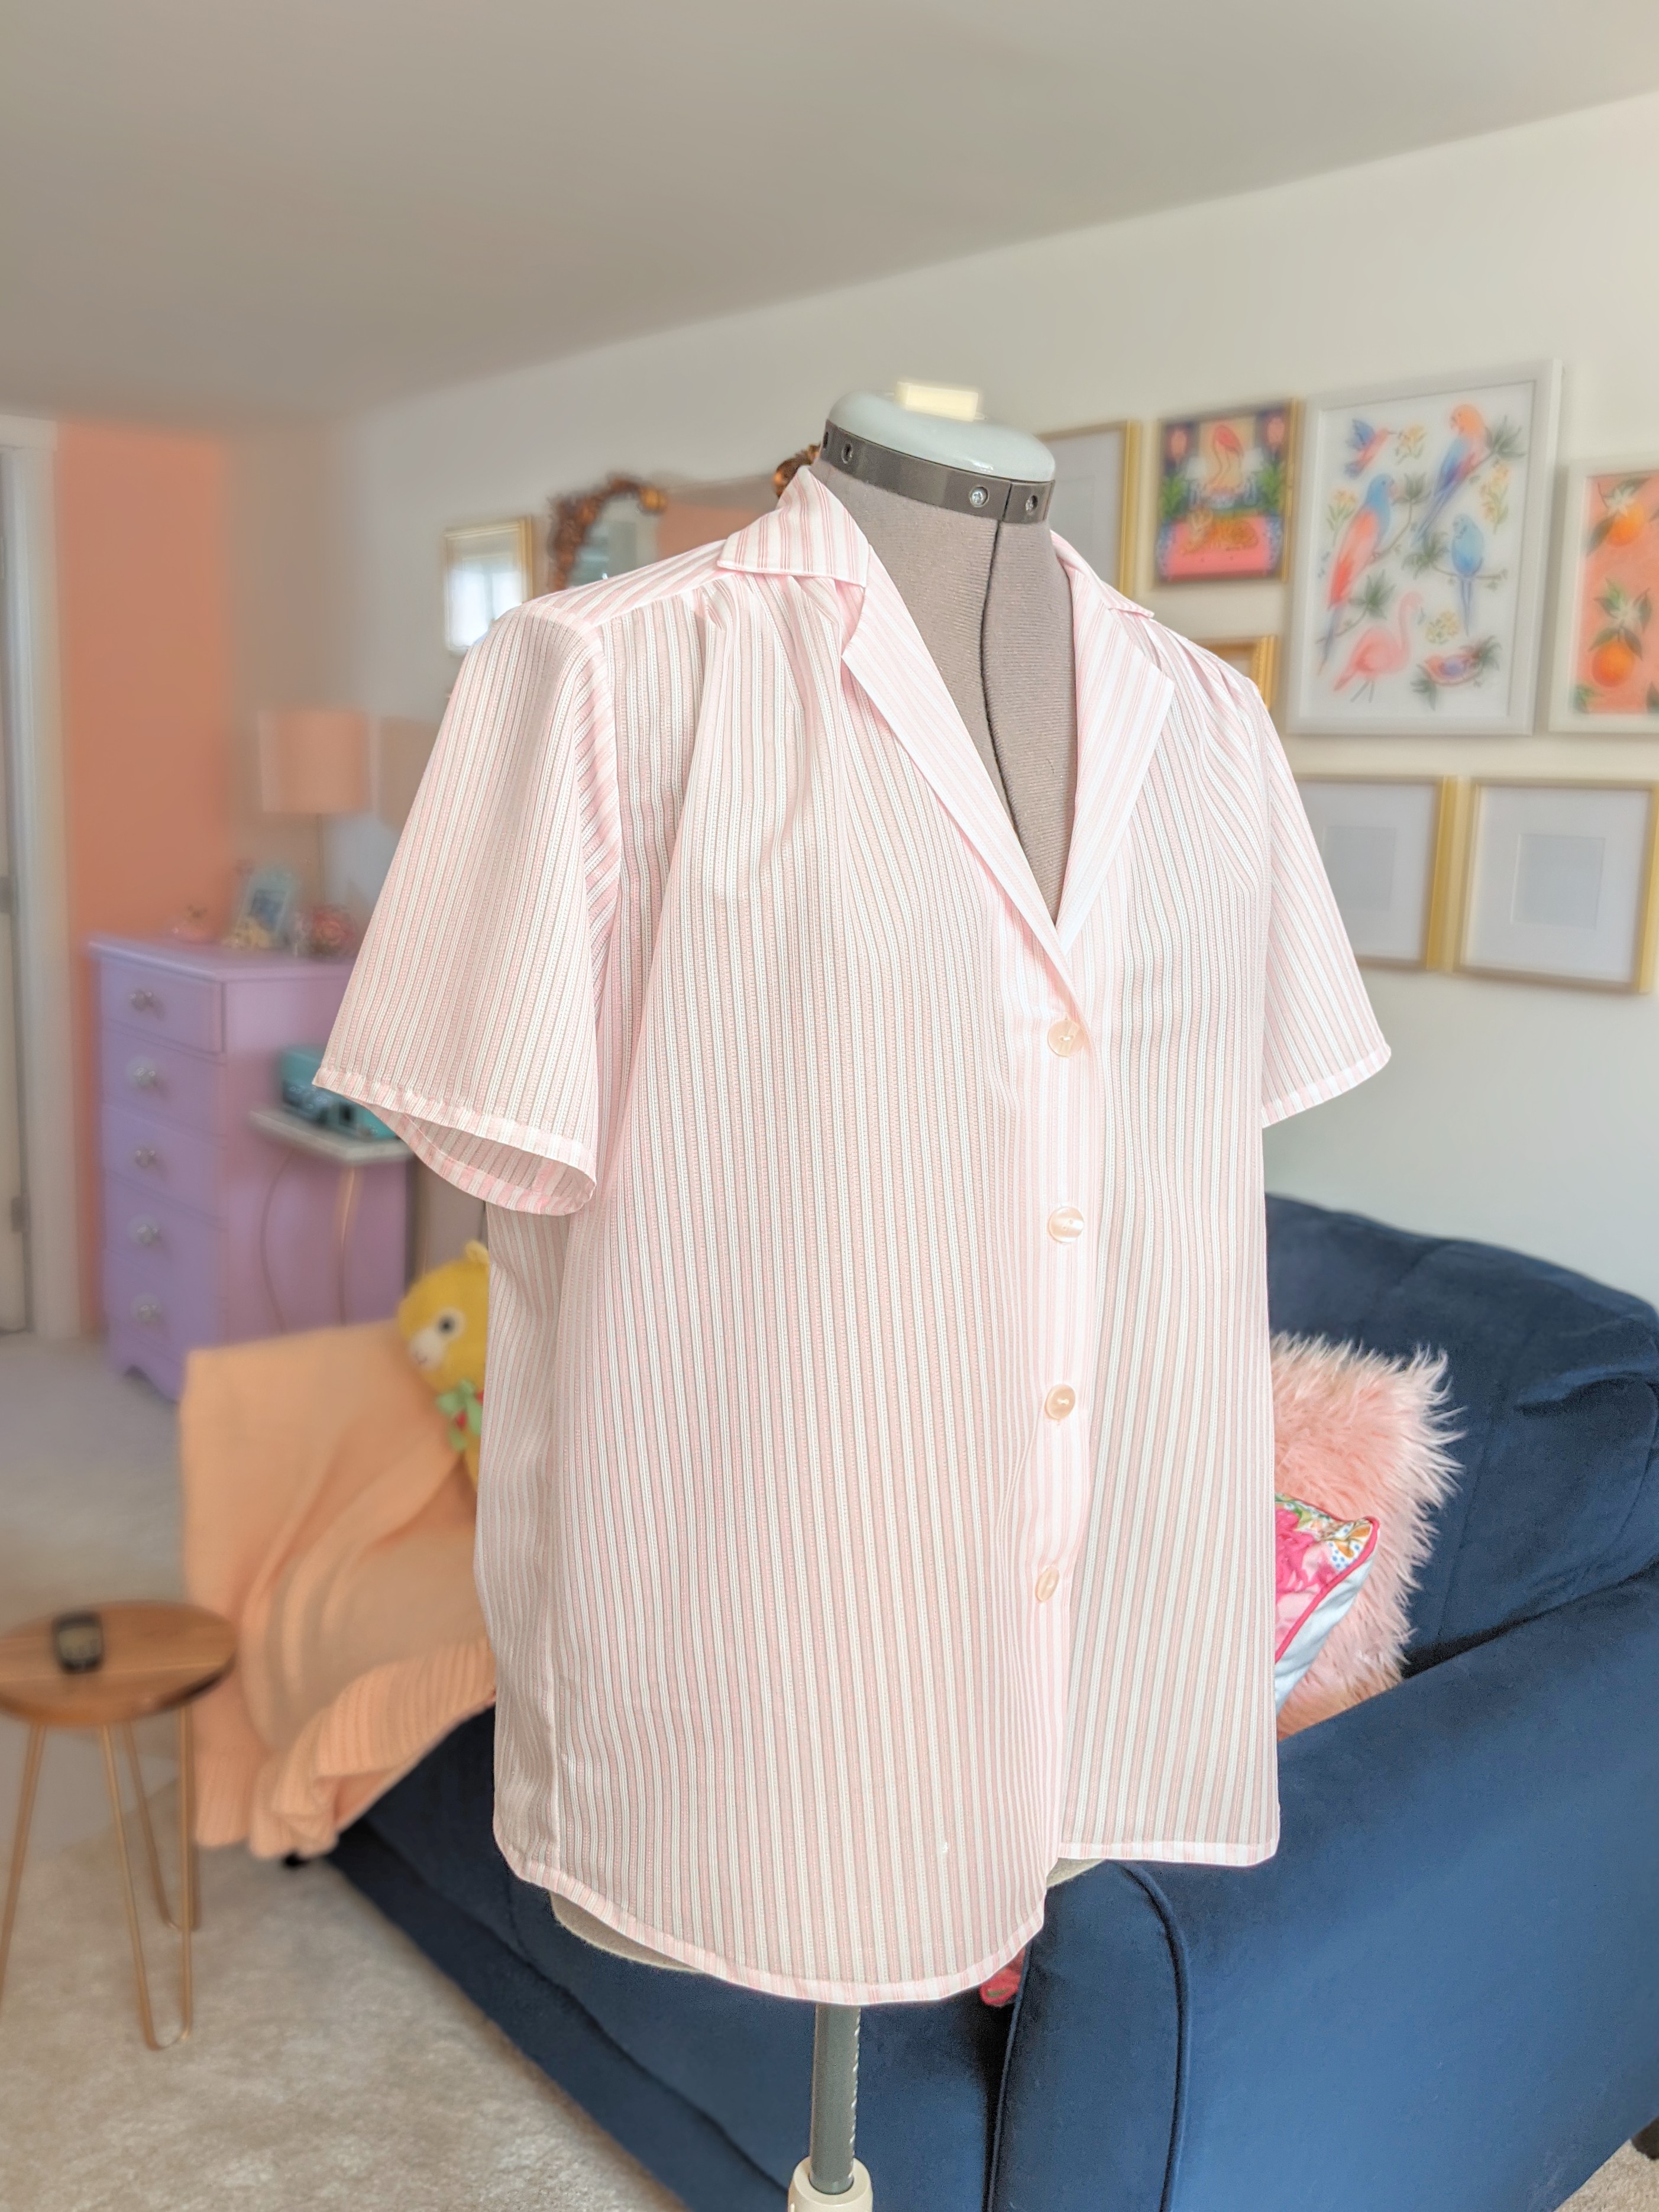
It's finally spring! Soon my garden will bloom and sunny days await me...at least that's what I'm hoping for. I'm in dire need of some summer friendly separates and I know warmer weather is on the horizon. I've decided I'm going to keep running with the 80's theme for awhile (I've been bingeing 80's movies and I'm greatly anticipating my annual rewatch of Steel Magnolias for Easter). I would like to mix and match blouses and shorts for some quick wardrobe building. I don't own many 80's blouse patterns, but this Butterick 4496 has a glamorous and feminine quality to it and it's been on my "to sew" list for awhile now. I can imagine it in a luxurious silk charmeuse, if only I had some! But for this project I decided to use a sheer ribbon like material that's been in my stash for several years. It's deeply reminiscent of the 80's and looks smashing with red lipstick!

I thought this pattern was going to be a breezy sew but several things tripped me up in the process. For starters, the previous owner did an awful job cutting out the pieces. I mean large jagged edges like someone cut it out blind folded. As such, some information was lost. I couldn't tell where the notches were located, or whether some lines were curved or straight. I had to rely on my drafting knowledge to fill in the gaps. I know that my redrafted version isn't quite right, I think the yoke ended up wider than it was supposed to be, but thankfully those problems were easy to work out during the assembly of the garment. Unlike my previous endeavors, the flat pattern measurements in this garment were fairly close to my own size, with the exception of the bust. I utilized Threads Magazine Dartless Full Bust Adjustment tutorial which I'm pleased to say really works! Yes, it's true, the hemline lays straight when worn. I highly recommend this tutorial.


After phasing out any known fit issues I proceeded with the muslin process. The instructions are fairly straight forward although I was surprised that they do not have you stay stitch the neckline, not until a few steps later, despite the fact that you handle the pattern pieces during this time. I recommend stay stitching all necklines first. Assembling the muslin went fairly well until I got to the collar unit. The instructions were slightly ambiguous. It says to clip as you go, but only after it tells you to install the collar, so I interpreted that as clip afterwards, but you are supposed to clip the neckline edge first so you can ease the collar into it. Even with the neckline pulled straight I could not get the unusually steep edge of the partial roll collar to match the neckline. I retried several times. Either the collar is missing something from when it was redrafted, or the neckline is missing something, but it would not work. I honestly felt like screaming. I had to resort to using a newly drafted straight collar instead, which was by far more manageable and better looking.

In the final project I decided to drop the angle of the lapel slightly to accommodate the new collar style (it was more curved before, probably in order to compliment the partial roll collar which has a roundness to it). Instead of gathering the bodice front and back into the yoke, I took the ease measurements and converted them into pleats and an open box pleat in the back. It looks much nicer. I had gathered the fabric when making the muslin, I found the effect was lacking, the pleats are more distinct and lay flat against the body. 

I love the yoke on this shirt, it's lined. The collar is attached to the bodice first. Then the yoke is attached to the self facing of the lapels and pressed. Afterwards, the yoke is sandwiched with the collar and exterior yoke (right sides together) and sewn. The seam is trimmed and clipped, and the yoke turned inwards, encasing all raw edges inside the lining. It looks very neat and professional. The only drawback with the yoke is that it has to be slip stitched into place at both the shoulder and back yoke seams which is quite tedious. The results, however, are worth it!


Speaking of tedious, there is a lot of slip stitching in this pattern! The placket facing, the yoke seams, and the entire hem of the shirt is slip stitched into place. I decided against hand sewing the bodice hem and instead turned it under in a similar way to the sleeve hems. I also catch stitched the collar into place to keep it from rolling up - I learned this technique from one of my sewing text books, it worked like a charm. 


One of the reasons I shy away from blouses is the buttonholes. I seem to be cursed with them. This was no exception, my buttonholes slipped under the specialty foot, so they're not perfect. It can't be helped now but next time I think I'll baste more before sewing them on my final project. 

Overall I ended up with a fun, candy striped blouse that brings back fond memories of yester year, and I can't wait to pair it with my fave sunnies and my mom jeans!

Quick Tips:

 Stay stitch all necklines first and foremost.

 Clip neckline notches before collar is installed.

 Slip stitch the back yoke seam working from the center out, once to the left and once to the right. I found doing this kept it from slipping to one side. Pins don't always hold things perfectly, it's better to be cautious! 

 If you're using a slippery material that won't sit still, try loosely catch stitching the collar onto the yoke to keep the collar from rolling up.


Simplicity 7951

Simplicity 7951

Misses' Dress (80's)

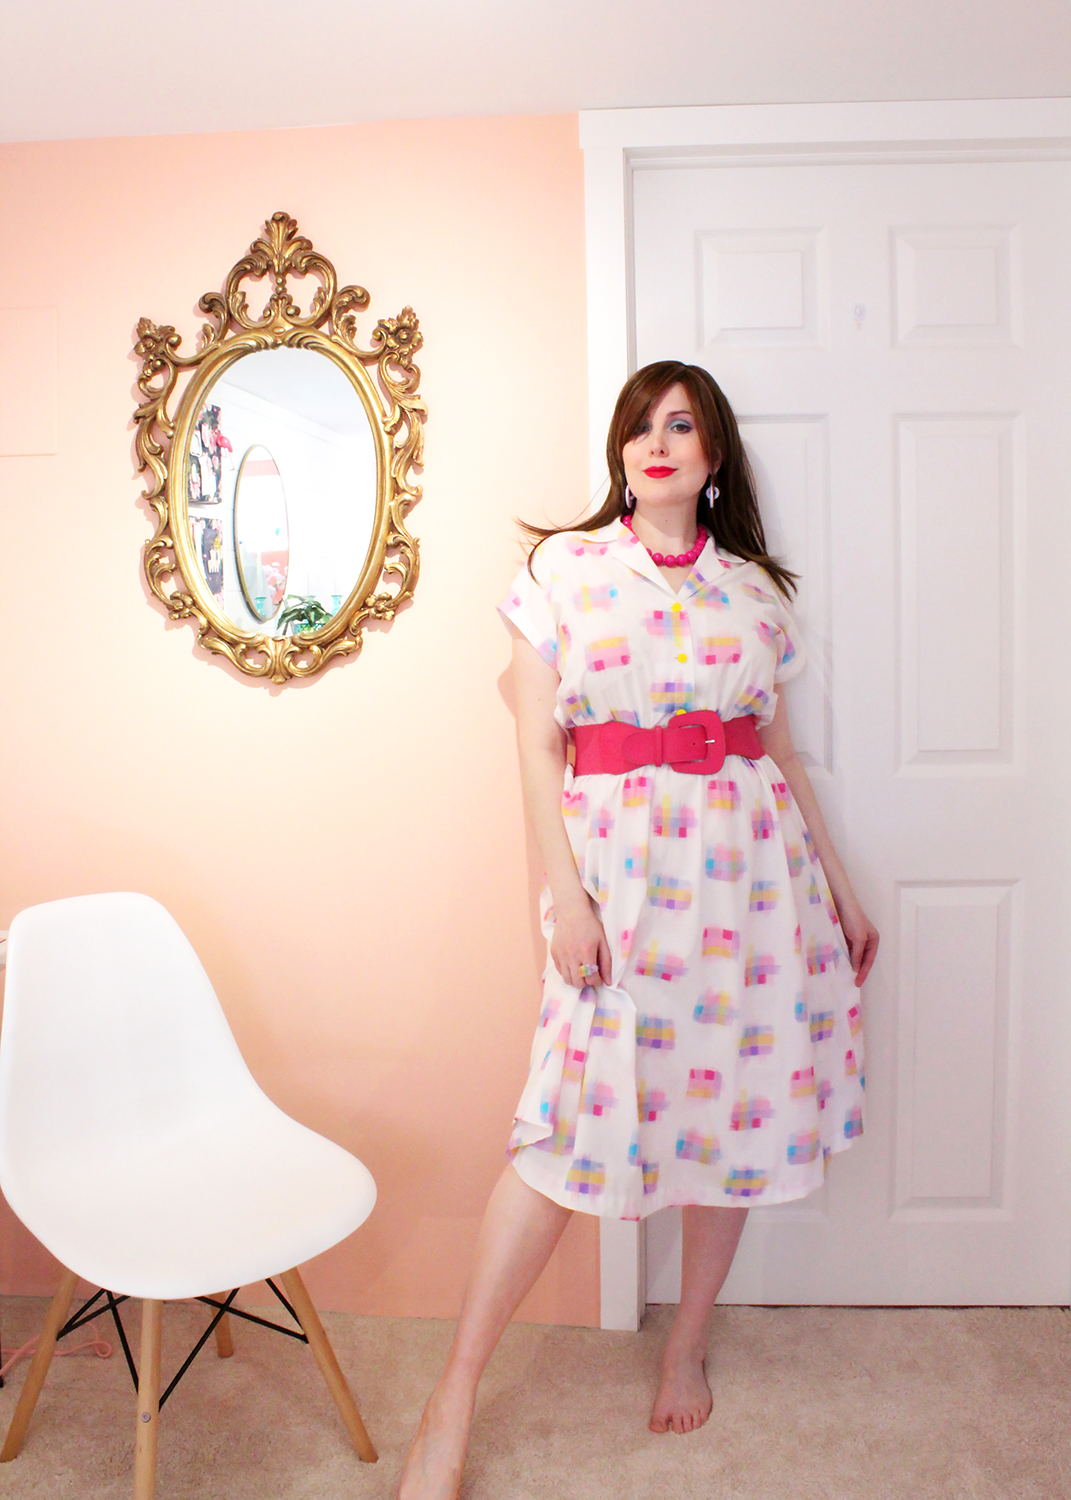
I actually finished this dress over a week ago now, I've just been waiting to get a photo of me wearing it. It's difficult to take pictures by yourself! Especially with an outdated DSLR. Thankfully I managed to snap this one good photo of me in my sewing room. 

This is Simplicity 7951, an OOP pattern from 1987 - yes, it's as old as I am! It features several variations of dress and jumpsuit styles. The waistline and skirt seam are gathered using elastic and there is a blouse front closure with functional buttons. I picked up a new term, thanks to the lovely members at PR, this garment features "blousing" which is where there is significant ease built into the bodice length creating a balloon effect. 

Sadly, the blousing exacerbates my figure flaws and I look like the dress is wearing me, hence why I am wearing a belt in the photo. It's quite lovely with a cinched waist!

This project took a little brainstorming on my part. Unfortunately, it is a secondhand pattern and often pre used patterns have problems, in this case it was a few sizes off and without an instruction manual. Thank goodness for my sewing text books! I was able to look up information on how to install a flat tailored collar, something I believe I have only done once and it was a very long time ago (and probably very poorly as I would've been a complete novice). The collar turned out nicely, although I didn't exactly enjoy slip stitching the collar shut.

I used Nancy Zieman's pivot and slide technique to increase the bust and waist size. I can't say for certain if the adjustment worked or not, because there is so much ease built into the garment I find the bodice just sort of hangs off of me. That being said though, my flat pattern measurements of the original cut size indicated it would fit my bust exactly with no ease, so it's without a doubt it needed to be increased. It's very confusing when you're not sure how the garment is supposed to look and feel. This is my first 1980's dress and I'm new to the silhouette so I wasn't sure what to expect.

I had to make up assembly as I went along. Even without instructions it's fairly straight forward. I decided to bind the armholes with self made bias tape. I also chose to use a blind hem stitch to hem the skirt. I love this technique because it looks almost invisible and I find it's less likely to twist the hem on a rounded edge. 

I assembled the bodice first and overcast the raw edges of the waistline seams on both the bodice and skirt using an overlocker. This created a clean finish inside before assembling the elastic casings. The waistline seams are pressed apart and outwards, creating a channel for the 3/8th inch elastic to go through. That's two rows of elastic. The problem with this design is that it naturally pulls against the waistline seam. I should've used a more narrow stitch length because as the material pulls across my body it pulls the seam open slightly, causing the stitches to show through. Since I wear the dress with a belt this is not a huge problem but it's something I would correct in future makes.

I finished the garment by sewing my buttonholes on using my old Kenmore Ultra Stitch. My newer brother continuously jammed during the button program and only made clean buttonholes half of the time. I wish it wasn't so unreliable as I really prefer the look of the satin stitch. My Kenmore does alright I just find the buttonholes don't las as long. I used vintage yellow shank buttons for this project, very fitting, and this is a new to me button so I learned how to hand cast them on which was a lot of fun.

I'm happy with this dress, maybe not thrilled with it. It's decent. It's very of the period. It's light and airy. So much so that I'll need to whip up a slip for underneath it! I'm not sure I would sew this pattern again but I enjoyed trying it out.

Simplicity 5110


Simplicity 5110

Women's Shorts

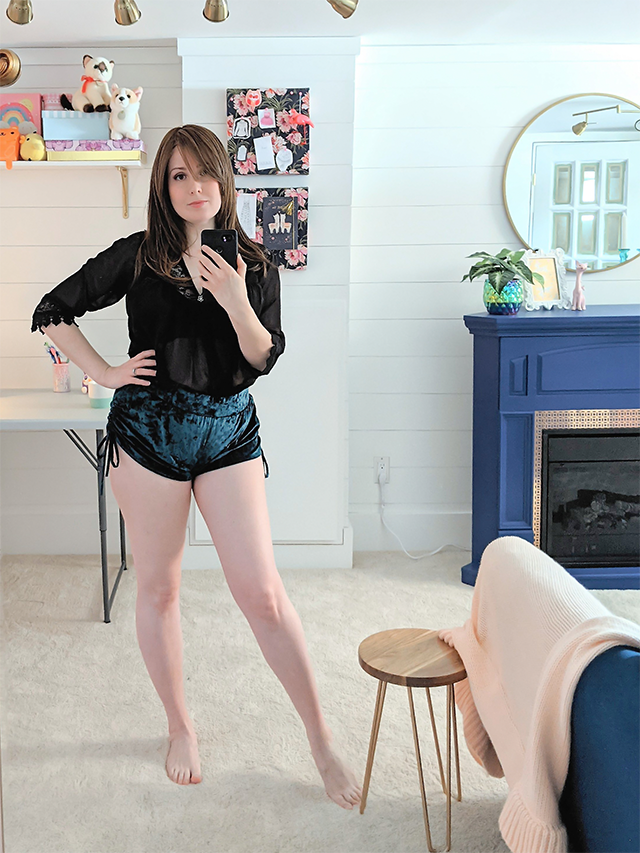
    Here's an OOP classic from the early 80's, Simplicity 5110. The pattern contains about four pairs of "one meter" shorts in different designs. I selected Vers. 3 which features a drawstring ruched side seam. This pattern was only available in single sizes, unlike most of today's patterns which allow you to choose from several sizes. As usual this pattern was four sizes too small  for me and I had to add about four inches overall to get it fitting correctly. 

    I created my muslin (not pictured) using a cotton plaid. The muslin turned out ok, it was easy to assemble and it used very little material. The shorts are high waisted so they have a tendency to ride up the bum and crotch. I'm not sure if this is a fit issue? It seems like all shorts get vacuumed into my butt crack. I have a hungry bum.

    For my final pair of shorts I used some spare crushed velvet from my stash. Between the two fabrics I preferred using the knit. While most of the shorts in this pattern would benefit from a sturdy material, like the recommended poplin or lightweight denim, the ruched shorts work best with knit. I had a hell of a time getting the drawstrings to sit correctly and gather when I made the cotton shorts. The knit was like butter.

    Now there are some obvious design differences, I dropped my waistline to sit beneath my belly button. High waisted shorts and pants often make me look bloated, I have a pooch/muffin top and a tight waist seam often pushes my fatty pooch out even further! Yuck. The drop waist looks infinitely better but due to the design of the garment it still has an almost puffy, diaper like quality to it. I changed from a gathered elastic waist to a flat elastic waist with casing. It makes a difference, it doesn't balloon out as much as it did when I used the gathered elastic waist. If you look at shorts from the late 70's and 80's a lot of them had gathered elastic waists. It's a terribly unflattering look and there's a reason it was left behind, knit fabrics have improved substantially since the 80's, it's allowed us to use less material with all the stretch and less puffiness. 

    I wouldn't say I don't recommend this pattern but I think it's important to bare the aforementioned problems in mind. If you have body issues and you don't want to exacerbate the pooch it might be worth redrafting a new waistline lower down. Otherwise it makes for a good pair of pajama shorts. I'm not so sure I'd wear these out and about, they cling to my booty like something fierce and look a bit scandalous lol, maybe I should wear them with tights underneath.

Whatever, my husband likes them.


Burda Style 7082


Burda Style 7082

Wrap Style Dress with Knotted Midriff

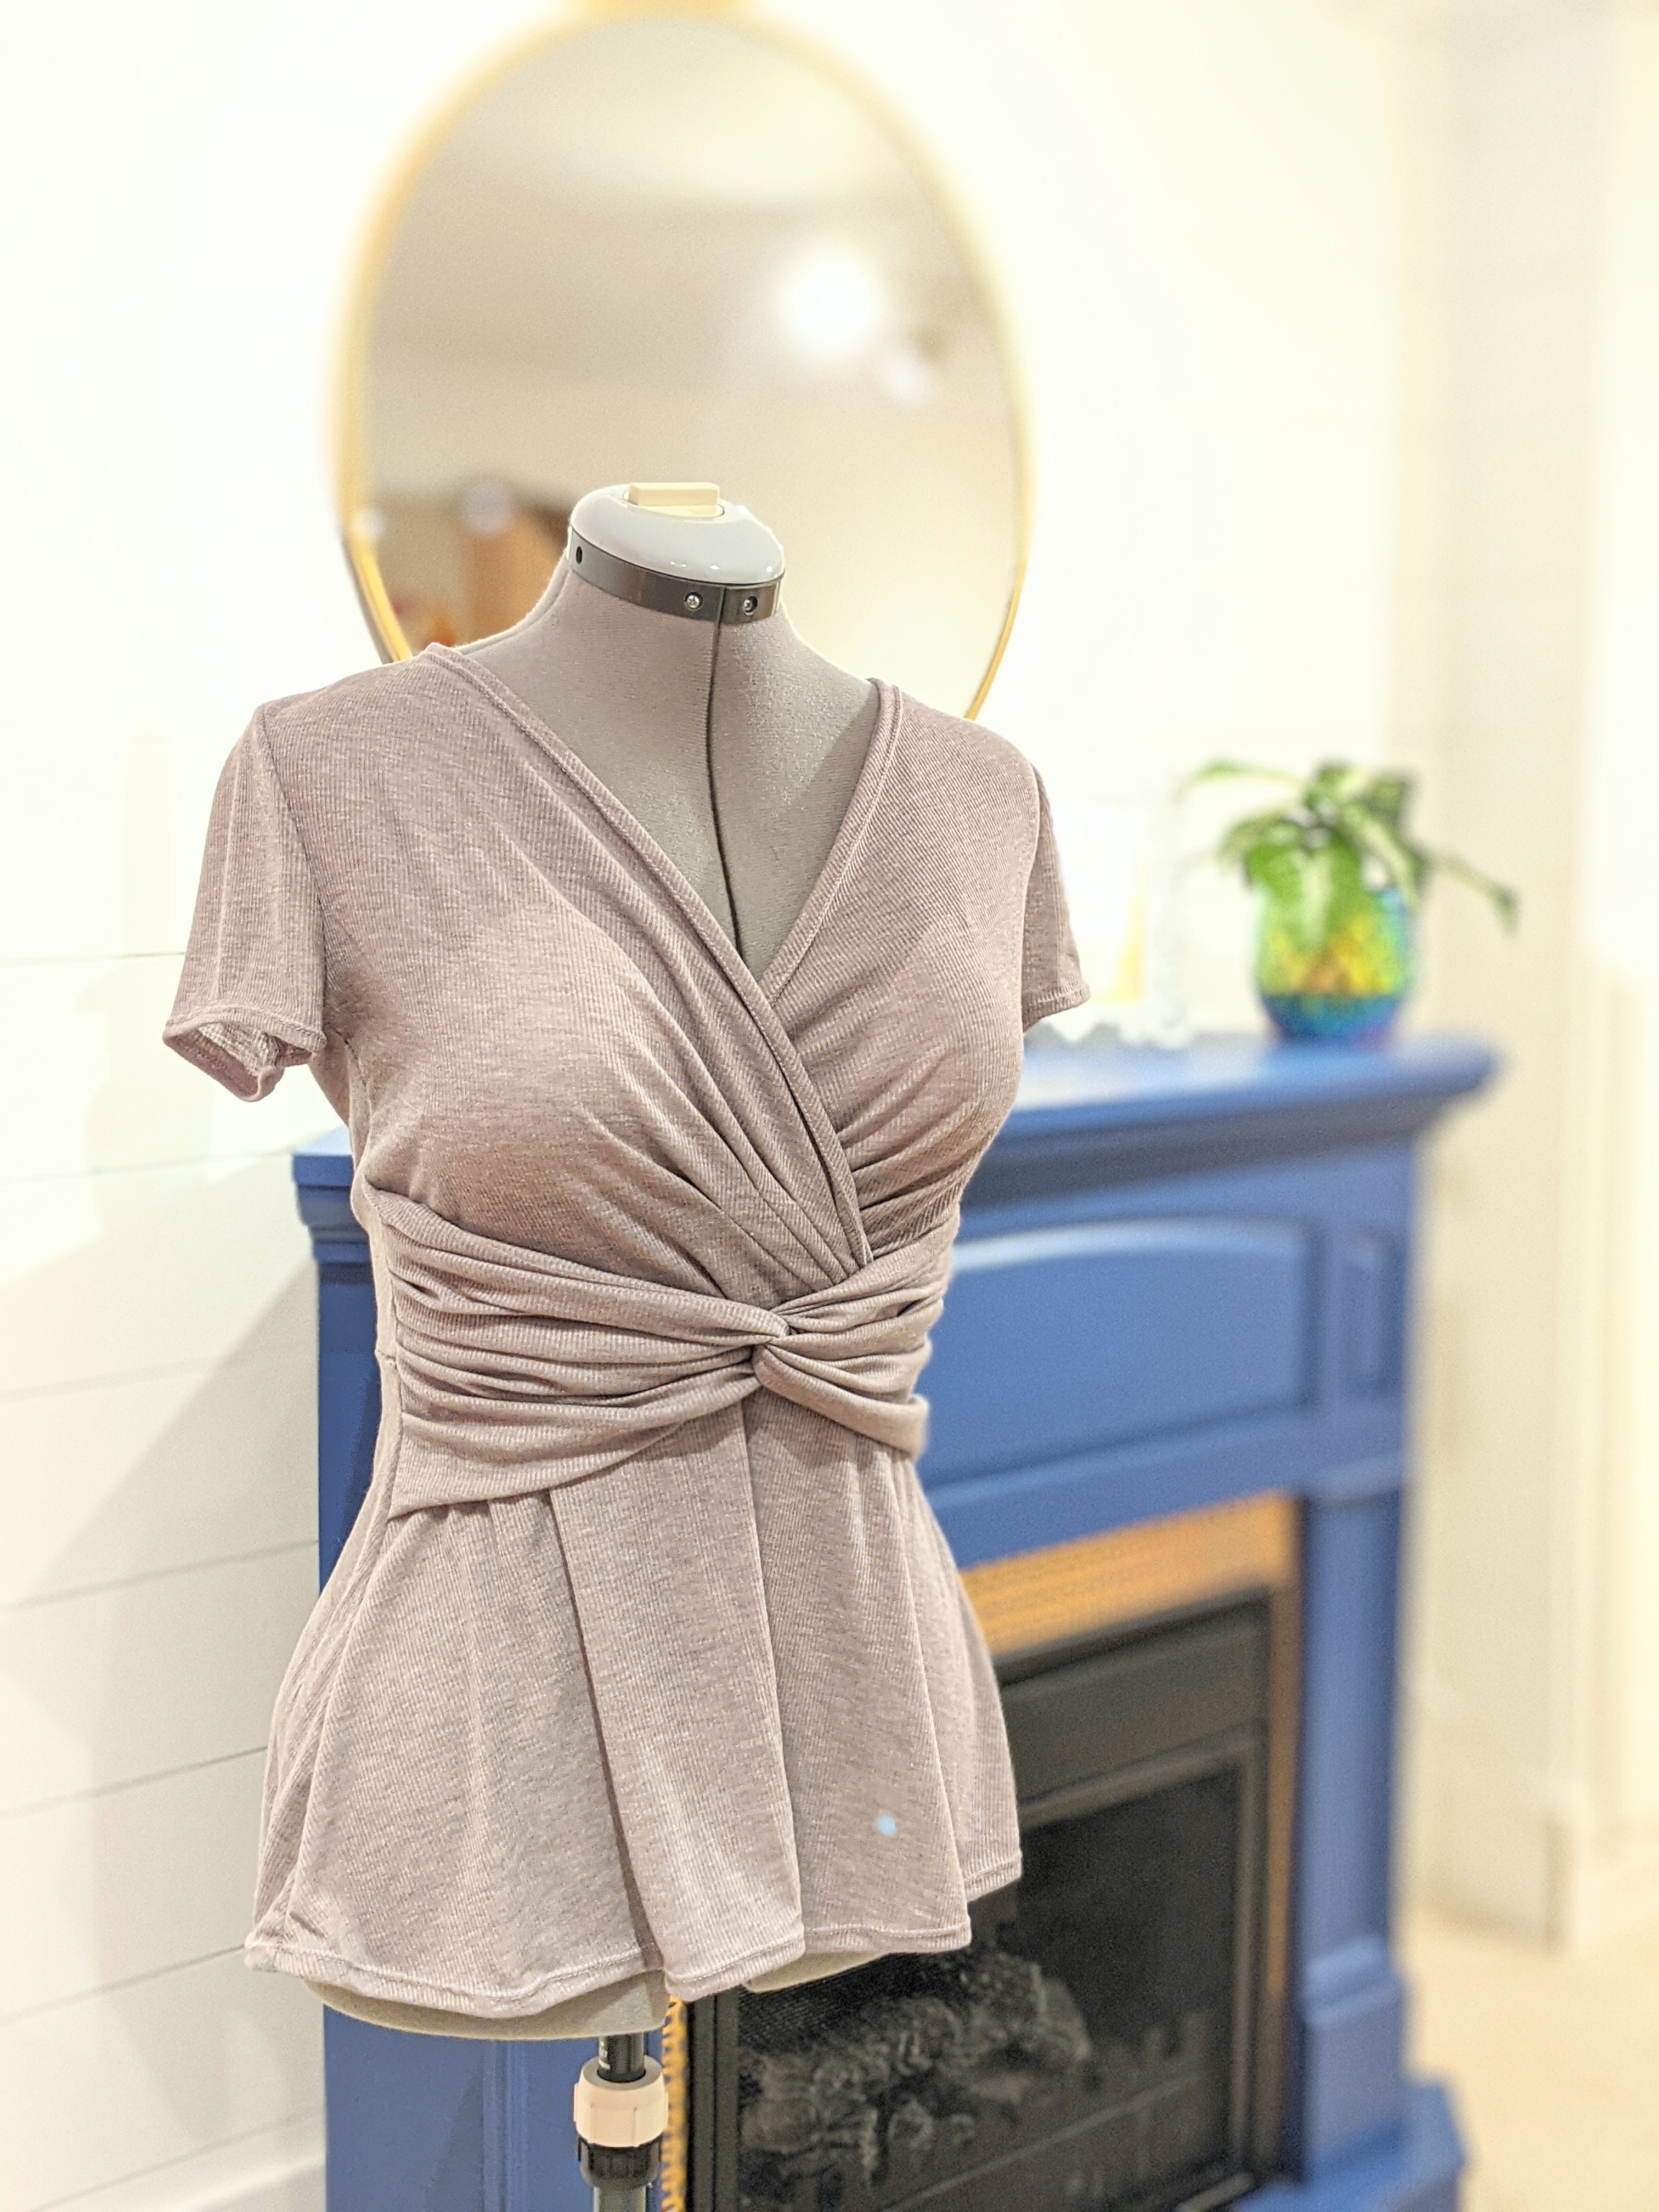
    I promise I won't regurgitate the same things I've said on Insta for every pattern review I write here. This is Burda Style 7082, an out of print wrap dress that features gathers at the bust and a shirred and knotted midriff. I bought this pattern second hand several years back and stashed it. At the time it didn't mesh with my style, but most recently I've been playing with more feminine and adult looking garments (bye bye bat printed dresses!), so this fit the bill. I had envisioned making this dress out of a gorgeous soft floral knit fabric. With all projects it's mandatory I make a muslin first, this helps me weed out any fit or design problems. Sadly, I only made it as far as the wearable muslin, photographed above. I ran into too many fit issues and lost steam with this project, but I'll endeavor to highlight the good and the bad of this pattern for future reference.

The Bad:

    It's probably best to start with the things I didn't like about the pattern. For the sake of ease I'm going to bullet list them:

  • The size chart is printed directly to the pattern paper and is nowhere on the envelope or instruction booklet. - This is such BS, all the other major pattern companies print it on the envelope or booklet. Imagine having to open the entire pattern in search of the size chart just to figure out what size you are and how much material you'll need. Maybe they've changed this in the last decade, one can only hope!

  • There is no stretch ratio gauge. The only recommended fabric is Jersey. I find that funny because I don't have access to fancy fabric boutiques, all I have is Fabricland and Len's Mills and Jersey only shows up sporadically depending on the year and the season. A stretch gauge would help me select an appropriate alternative and allow me to determine the stretch ratio for future reference.

  • There are no bust points or waist line adjustment markings on the pattern itself. Go figure, they put all that other crap on the pattern paper but not the things you wish you had.

  • After sewing the gathers at the bust I found there was far too much material at the waistline seam which caused the seamline to look misshapen. The bust darts/gathers don't lay across my bust correctly, they look odd. This lead me to apply the midriff by hand and direct the gathers according to my shape and not what the pattern indicated.

  • The midriff has a raw edge! Weird, I suggest hemming it to give it a professional finish, as it is knit it would inevitably roll outward. 

  • It features a side zipper(!?) Take inventory of your closet, how many knit garments have zipper closures? Very, very few. And when they do exist they are almost always heavier weight knits with a lower stretch ratio. I nixed the zipper and sewed the seams as I normally would on knitwear, the stretch recovery allows this top to be a pullover. Zippers are fussy at the best of times, but side zippers, plus excess fabric in the side seam, plus it being knit fabric is a recipe for disaster. 

The Good:

    No bullet points required for the good as there weren't many things to praise here. There is a cool trick where the extension that acts as the self facing of the front bodice neckline is sewn directly into the shoulder seam and then turned so it sits flat. I loved that. I also don't mind the idea of the garment as a whole, it's just a shame it was so damn hard to get fitting correctly.

The Alterations: 

    There was a short waist alteration, a shoulder slope, an armscye adjustment at the back, the neckline was taken in several inches more using a slash and close technique, and I drafted a peplum instead of using the available skirt due to lack of material. I also hand gathered and applied the midriff to the bodice by hand. The top fits but only just, there's still excess at the neckline.

    After I did some research I discovered that women with longer torsos had better luck sewing this pattern from the envelope whereas those of us with short waists and typically large breasts really struggled to fit this pattern to our bodies. It must not be as easy as simply removing length, I wonder if I was supposed to decrease the pleats and gathers and change their position. I'm not so accomplished that I know how to fix these problems, but if I do return to this pattern I will try playing with the neckline shape and gathers.

Advice: 

    Don't install a zipper. Use flat pattern measurements to determine whether the neckline and other parts of the bodice will fit you. You can apply these measurements to the fabric and test them against your body; for example if I measured the neckline as 15" I would try to match the placement of the neckline grain on my fabric and hold that measurement across my chest, checking for stretch and fit. No cutting necessary! All we want to see is if 15" inches of fabric on grain fits or not when draped across the bust from the shoulder point to the supposed waistline seam. Make sense? It's a quick and dirty way to discover whether or not there are fit discrepancies with the negative ease. Experiment with the gathers before finalizing them, meaning you need to baste, baste and baste! 


    I might return to this dress pattern but I'm pretty burnt by it. Sometimes patterns are like toxic friendships, you might need distance to see them for what they are! 

Introduction


HELLO!

    I can't believe I'm starting another blog again. Maybe I'm bored or perhaps I've become too disillusioned with social media apps. I find connecting with other sewists has become increasingly difficult in an ever changing, yet startlingly stale online landscape. My Instagram reach is pretty much zero. I've been locked out of old accounts. Feeds aren't showing users that I actually want to see content from. It's dried up. And yet, here I am utilizing a form of social media that's even more petrified and neglected than Instagram! Why? Because I need to document my projects somewhere. Even if nobody sees them or gleans anything from my experiences, it's nice to have a voice, even when no one is around to hear it. 

    So much has changed over the pandemic. I have my studio space back. I suffered losses. I had some gains. I grew up. I wear alt clothing but not like I used to. I'm changing and I'm learning new things about myself. I'm ready to welcome another chapter of my life. I won't be sharing the more intimate side of things. I've read that's not what blogging is for any more. Apparently blogs are better served as resources, so that's what this blog will be: a resource for pattern reviews, adaptations, drafting and sewing tips. I want it simple and sweet, and who knows, maybe that will be just enough to keep it going for a little while!  

It's nice to meet you!